How to Create a Project Timeline in 6 Steps: A Quick Guide
 Victoria Sokolova
.
June 14, 2026
.
Project Management
.
12 mins READ
Victoria Sokolova
.
June 14, 2026
.
Project Management
.
12 mins READ
The success of any project largely depends on the efficiency of its initial planning and tracking its progress. In project management, there’s a variety of tools that make it possible to plan project work and assess the workflow from different perspectives. A project timeline is one of them. What is it exactly, and how to create one? Let’s figure it out in the article.
A project timeline: Definition and importance
A project timeline is a visual representation of project tasks and activities ordered chronologically. It provides a comprehensive overview of the whole initiative, which allows a project manager to monitor its progress and make sure that it will be delivered on time.
Based on the project timeline’s meaning, it may seem that it’s similar to a work breakdown structure – they both suggest a visual representation of a project with all its components. But their focus is different: the main purpose of a work breakdown structure is to give an idea of the scope of an initiative, while the timeline is rather a project’s timetable.
Why is it essential to create a project timeline?
Basically, a project timeline gives an insight into the duration of an initiative. But here are some more of its functions.
- It gives an idea of project activities that have to be performed, their sequence and duration.
- It serves as a reference point for the project team members regarding project activities’ deadlines and the due date.
- It allows a project manager to monitor the project's progress and make sure that the initiative will be delivered on time.
- It makes it possible to identify and timely resolve bottlenecks caused by resource conflicts.
Now, let’s examine the process of developing a project timeline.

6 steps to create a project timeline
Most often, project timelines are developed with the help of project/resource management software that has related functionality. But before you can input the necessary data into the system, you need to perform the following preparatory steps. [1]
Step 1. Compile a project overview
Before initiating a project, you should prepare some documents that would present its clear overview for stakeholders and/or the team. One of the variants of such documents is a project scope statement – the description of the project scope, deliverables, milestones, assumptions, and constraints. In other words, it’s a detailed summary of a project for stakeholders. However, preparing a detailed scope statement is a time-consuming task, so it’s more suitable for large projects that require a more scrupulous description.
For smaller projects, it’s more reasonable to create a project brief – it’s also a summary of a project but less detailed and less formal. It presents a concise description of a project and its goal, specifies project stakeholders and the team, as well as project success criteria.
Step 2. Develop a work breakdown structure
The next step involves creating a work breakdown structure – a visual representation of the whole project scope divided into smaller components that can be scheduled, estimated, monitored, and controlled. The key function of a work breakdown structure is providing a structured vision of what has to be delivered as part of a project. In addition, it’s the basis for other project management processes (planning, scheduling, resource allocation, risk identification) and documents.
In brief, the process of creating a WBS can be represented as a series of the following steps:
- Identifying the final deliverable of a project (based on the project goal),
- Breaking it down into smaller interim deliverables;
- Dividing them into smaller components – work packages (in a great number of cases they’re the same as project tasks).
These activities can also be performed in reversed order depending on the selected approach – the top-down or bottom-up.
Read more: Creating a Work Breakdown Structure: What You Need to Know
Step 3. Determine dependencies between tasks
Project tasks don’t exist separately: most of them depend on the other assignments. There are four most common types of dependencies:
- Finish to Start: activity B can only start when activity A is finished;
- Finish to Finish: activity B can finish only when activity A is finished;
- Start to Finish: activity B cannot finish until activity A is started;
- Start to Start: activity B cannot start until activity A has started.
When there are multiple projects in the pipeline, there are also dependencies between projects. For example, projects can have a resource dependency when they share the same resources (either human or material); outcome dependency occurs when the outcome of one project affects the other project’s deliverable.
Read more: Managing Project Dependencies In a Multi-Project Environment
All of these dependencies should be taken into account when creating a project timeline, as long as they have a significant impact on its duration.
Step 4. Estimate each task duration
There are several approaches to estimating the duration of project tasks. The first one involves establishing each task’s start and finish dates. On the other hand, setting strict deadlines creates a more predictable and structured workflow – every team member knows when their tasks are due. But on the other hand, such an approach is counterproductive: when team members have strict task completion dates, they start working on them as close to the deadline as possible. Such a phenomenon is called student syndrome.
The other approach involves estimating the time required to complete a task, which is expressed in hours (work hours, man-hours), prioritizing assignments, and completing them as soon as possible. One more essential condition is adding a time buffer to the end date of a project to protect its due date in case of contingencies. Creating a project timetable with such an approach requires a software solution with advanced capabilities. But the main benefit is that it will allow team members to work more efficiently and deliver projects faster.
Step 5. Identify available resources
The availability of resources (both human and material) also affects the duration of a project. You need to know how much capacity is required for project completion and how much is available. If you don’t have enough available resources, the duration of an initiative will be longer: you’ll have to postpone some activities until resources become available or look for the other ones. When it comes to the unavailability of people, a project manager can apply resource leveling – in this case, a project’s start and finish dates can be adjusted based on resource constraints. Sometimes, resource leveling requires the application of schedule compression techniques – fast tracking (when sequential tasks are performed in parallel) and crashing which involves adding extra resources.
Step 6. Use project/resource management software
Finally, we’ve made it out to creating the timeline in the project/resource management software. If you manage large and complex projects or multiple projects running simultaneously, you’ll need a more advanced system that just spreadsheets to address all this complexity. Let’s consider how you can deal with timelines in Epicflow, a multi-project resource management solution designed to meet the needs of a multi-project environment with a shared resource pool.
• An effective approach to task estimation.
In Epicflow, you should estimate each task’s duration in man-hours (work hours) instead of setting their start and finish dates and add a time buffer to the end date of a project instead of adding it to each assignment.
• Setting the right priorities.
After you enter the assignments into the system, Epicflow prioritizes tasks across the whole project environment, and every team member receives a prioritized personal to-do list. As people complete their tasks, the priorities are recalculated again.
• Providing employees' capacity data.
When identifying available resources for your timeline, in Epicflow, you can not only see the list of available employees but also forecast their future capacity, which is extremely important when initiating a new project that will share resources with the other initiatives.
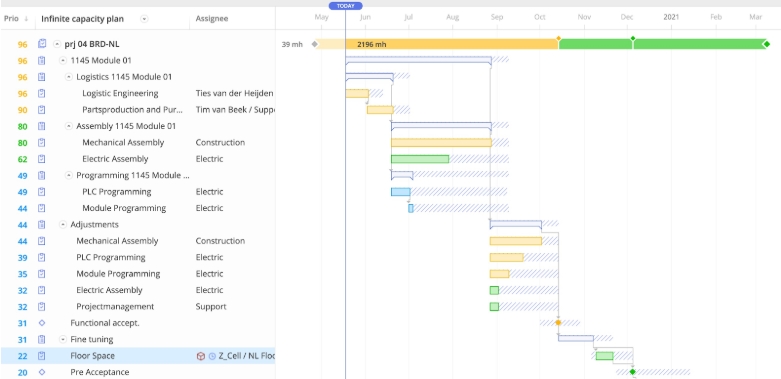
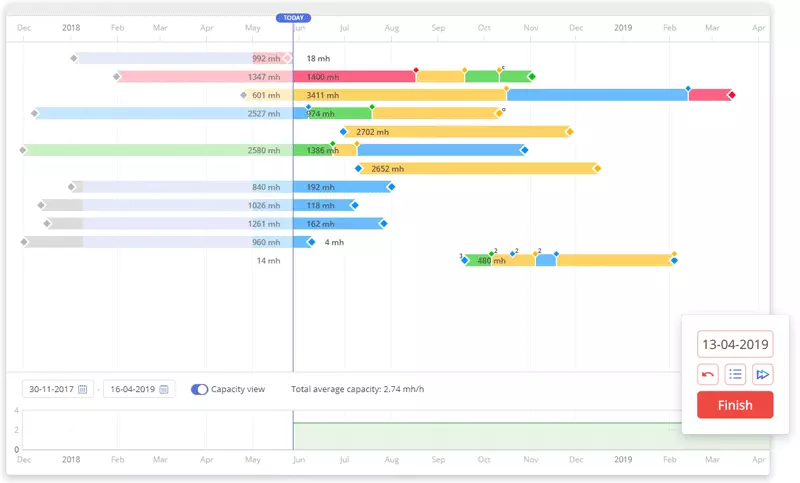
• Overview of a project timeline.
Epicflow’s Gantt Chart is actually a representation of a project timeline: it shows all the task dependencies across the whole multi-project environment, all task-related information, and gives an opportunity to track project progress.
• Monitoring progress with regard to a project’s due date.
Epicflow’s color-coding system gives an insight into the state of task or project completion in relation to the remaining buffer; it can also show how many days a task/project will be late in case there’s no more time buffer left.
• More effective decision-making.
You can reduce uncertainty in decision-making thanks to Epicflow’s predictive capabilities – you can set required parameters in the What-if analysis mode, run these scenarios, analyze them, and come up with the most reasonable solution.
If you have questions about Epicflow’s project management functionality or want to explore how it can help you deliver more projects with the same number of resources on time and budget, don’t hesitate to book a call with our expert and see our system in action.
References
- Usmani, Fahad. What is a Project Timeline and How to Write it? Retrieved from: https://pmstudycircle.com/project-timeline/